Back to the case study...
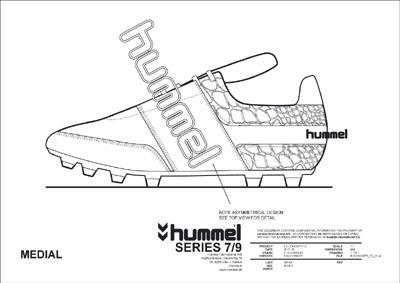
Following the initial concept sketch development the design of the 6.2 Concept FG was transferred to Illustrator to finalize detail, pattern and construction. At this point the design is created in line art form showing different views, details and construction to be able to send to the factory to make a first pullover.
More pics and text after the Read More link below.
NOTE- For all illustrations on this post, you can click for a larger view.
These drawings are made using Illustrator and a standard (for hummel) outline to help the pattern maker in Taiwan make the base pattern and first sample of the design. It is very important at this stage to ensure that details such as stitching, and seams are shown so they can be correctly interpreted in the pattern.

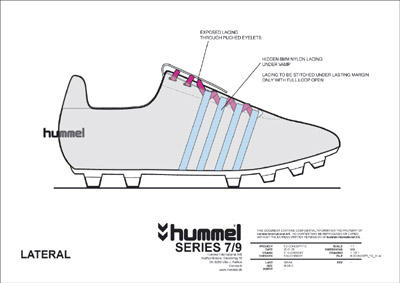
If the pattern is asymmetrical (different medial and lateral side) it is also very important to show both sides. At this point, in the footwear industry is is typical that designs for uppers are sent without any dimensions, but rather left to the patern maker for interpretations. As a shoe is a 3D object (based on the shape of the last
using 2D elements (flat pattern parts of leather/synthetic) the transfer from 2D (drawing) to 3D (shoe) via 2D (pattern) is very complicated and requires the experience of an expert pattern maker. Later in this series I will covering more about pattern making.

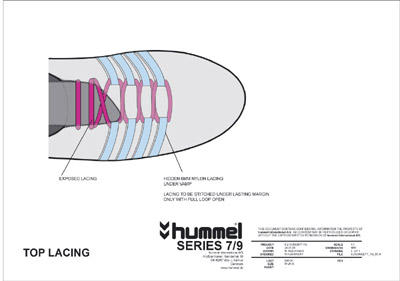
This illustration shows the construction of the inside webbing (lacing) system. The 6.2 was initially designed to feature a partially hidden webbing construction to optimize the ball contact area on the vamp for football control. As well, the webbing construction was specified to be attached only at the lasting edge of the upper and to the eyestay to create a free lacing cage. More on this system later...

Webbing construction again.

Top view.
Labels: case study, design, development, football, hummel, photo, process, production, sample


0 Comments:
Post a Comment
<< Home